User Guide
Hint
This document will refer to issues as the primary store of information in the tracker. This is the default of the classic template, but may vary in any given installation.
Your Tracker in a Nutshell
Your tracker holds information about issues in bundles called items. An item can be an issue (a bug or feature request) or a user. The issue-ness or user-ness is called the item’s class. For bug reports and features, the class is “issue”, and for users the class is “user”.
Each item in the tracker possesses an ID number that identifies it alongside its item class. The combination of the class and ID number into a label identifies a specific issue or user. For instance, user 1 (who, by the way, always serves as the “admin” user) gets referred to as “user1”. Issue number 315 gets denoted as “issue315”. This label receives the designation of the item’s :term:designator.
Roundup never deletes items from the database. Instead, items get “retired”. Viewing the item using its ID is still possible - thus, “removing” an item does not disrupt references to it. A retired item will not appear in the class listing.
Accessing the Tracker
You may access your tracker in three ways:
through the web interface,
through the e-mail gateway, or
using the command line tool.
The last is usually only used by administrators. Most users will use the web and e-mail interfaces. All three are explained below.
Issue life cycles in Roundup
New issues may be submitted via the web or e-mail.
By default, the issue will have the status “unread”. When the issue receives another message, its status will change to “chatting”.
Often, the “home” page for a tracker display all open issues (closed issues have a status of resolved, or done-cbb (cbb - could be better)).
If an issue is closed, and a new message is received then it’ll be reopened to the state of “chatting”.
The full set of priority and status values are:
Priority |
Description |
|---|---|
“critical” |
panic: work is stopped! |
“urgent” |
important, but not deadly |
“bug” |
lost work or incorrect results |
“feature” |
want missing functionality |
“wish” |
avoidable bugs, missing conveniences |
Status |
Description |
|---|---|
“unread” |
submitted but no action yet |
“deferred” |
intentionally set aside |
“chatting” |
under review or seeking clarification |
“need-eg” |
need a reproducible example of a bug |
“in-progress” |
understood; development in progress |
“testing” |
we think it’s done; others, please test |
“done-cbb” |
okay for now, but could be better |
“resolved” |
fix has been released |
The tracker you are using may have different priorities and statuses. See your tracker admin for local details.
Entering values in your Tracker
All interfaces to your tracker use the same format for entering values. This means the web interface for entering a new issue, the web interface for searching issues, the e-mail interface and even the command-line administration tool.
String Properties
These fields just take a plain text value, like It's broken.
Number Properties
These fields take a real number with decimal point like +12456.78,
-12456.78 12456.78. It supports scientific/exponent notation
like 3.1415E-2. Decimal commas (e.g. 123456,78) or thousand
separators -12,456.78 are not supported.
Integer Properties
These fields take a whole/integer number without decimal marker like
123, +123, -123. Exponents are not supported. Your browser
may show an up/down arrow spinner to change the value.
Boolean properties
These fields take a value which indicates “yes”/”no”, “true”/”false”, “1”/”0” or “on”/”off”.
Constrained (link and multilink) properties
Fields like “Assigned To” and “Keywords” hold references to items in other classes (“user” and “keyword” in those two cases.)
Sometimes, the selection is done through a menu, like in the “Assigned To” field.
Where the input is not a simple menu selection, we use a comma-separated list of values to indicated which values of “user” or “keyword” are interesting. The values may be either numeric ids or the names of items. The special value “-1” may be used to match items where the property is not set. For example, the following searches on the issues:
assignedto=richard,georgematch issues which are assigned to richard or george.
assignedto=-1match issues that are not assigned to a user.
assignedto=2,3,40match issues that are assigned to users 2, 3 or 40.
keyword=user interfacematch issues with the keyword “user interface” in their keyword list
keyword=web interface,e-mail interfacematch issues with the keyword “web interface” or “e-mail interface” in their keyword list
keyword=-1match issues with no keywords set
When entering the value for a constrained property you may have a
helper (also called classhelper) available by clicking on a link
usually displayed as (list). See the section Using the
Classhelper for details.
Date properties
Date properties can be shown using a native HTML date (or
datetime-local) element by setting use_browser_date_input=yes in
section [web] in config.ini. This provides a calendar button for
choosing the date. The date is shown in the normal format for your
location.
Native date inputs do not allow the use of partial forms as defined below. For this reason, you may edit a date/time stamp directly.
Date-and-time stamps are specified with the date in
international standard format (yyyy-mm-dd) joined to the time
(hh:mm:ss) by a period .. Dates in this form can be easily
compared and are fairly readable when printed. An example of a valid
stamp is 2000-06-24.13:03:59. We’ll call this the “full date
format”. When Timestamp objects are printed as strings, they appear in
the full date format.
For user input, some partial forms are also permitted: the whole time or
just the seconds may be omitted; and the whole date may be omitted or
just the year may be omitted. If the time is given, the time is
interpreted in the user’s local time zone. The Date constructor takes
care of these conversions. In the following examples, suppose that
yyyy is the current year, mm is the current month, and dd is
the current day of the month and the local timezone is GMT-5.
“2000-04-17” means <Date 2000-04-17.00:00:00>
“01-25” means <Date yyyy-01-25.00:00:00>
“2000-04-17.03:45” means <Date 2000-04-17.08:45:00>
“08-13.22:13” means <Date yyyy-08-14.03:13:00>
“11-07.09:32:43” means <Date yyyy-11-07.14:32:43>
“14:25” means <Date yyyy-mm-dd.19:25:00>
“8:47:11” means <Date yyyy-mm-dd.13:47:11>
the special date “.” means “right now”
The native date input doesn’t allow copy or paste. Roundup enhances the native date field. If you double-click on a native date field, it changes to a text input mode with the date already selected. You can use control-C to copy the date or control-V to paste into the field. Double-clicking also lets you add seconds in a date-time value if you need to.
It will switch back to a date input and save the value when:
you move to another field using the mouse or the Tab key.
you press enter/return (press return again if you want to submit the form).
If you press Escape, it will restore the original value and change back to a date input.
When using native date elements in text input mode, the date
looks like a full data with T replacing .. If the T
is missing, the native date elements will not recognize the value
as a date.
There is no support for activating text mode using the keyboard. Tablet/touch support is mixed. Chrome supports double-tap to activate text mode input. Firefox does not.
When searching, a plain date entered as a search field will match that date exactly in the database. We may also accept ranges of dates. You can specify range of dates in one of two formats:
English syntax:
[From <value>][To <value>]
Keywords “From” and “To” are case insensitive. Keyword “From” is optional.
“Geek” syntax:
[<value>];[<value>]
Either first or second <value> can be omitted in both syntaxes.
For example, if you enter string “from 9:00” to “Creation date” field, roundup will find all issues, that were created today since 9 AM.
The <value> may also be an interval, as described in the next section.
Searching of “-2m; -1m” on activity field gives you issues which were
active between period of time since 2 months up-till month ago.
Other possible examples (consider local time is 2003-03-08.22:07:48):
“from 2-12 to 4-2” means <Range from 2003-02-12.00:00:00 to 2003-04-02.00:00:00>
“FROM 18:00 TO +2m” means <Range from 2003-03-08.18:00:00 to 2003-05-08.20:07:48>
“12:00;” means <Range from 2003-03-08.12:00:00 to None>
“tO +3d” means <Range from None to 2003-03-11.20:07:48>
“2002-11-10; 2002-12-12” means <Range from 2002-11-10.00:00:00 to 2002-12-12.00:00:00>
“; 20:00 +1d” means <Range from None to 2003-03-09.20:00:00>
“2003” means <Range from 2003-01-01.00:00:00 to 2003-12-31.23:59:59>
“2003-04” means <Range from 2003-04-01.00:00:00 to 2003-04-30.23:59:59>
Interval properties
Date intervals are specified using the suffixes “y”, “m”, and “d”. The suffix “w” (for “week”) means 7 days. Time intervals are specified in hh:mm:ss format (the seconds may be omitted, but the hours and minutes may not).
“3y” means three years
“2y 1m” means two years and one month
“1m 25d” means one month and 25 days
“2w 3d” means two weeks and three days
“1d 2:50” means one day, two hours, and 50 minutes
“14:00” means 14 hours
“0:04:33” means four minutes and 33 seconds
Simple support for collision detection
Item edit pages remember when the item was last edited. When a form is submitted, the user will be informed if someone else has edited the item at the same time they tried to.
Web Interface
Note
This document contains screenshots of the default look and feel. Your site may have a slightly (or very) different look, but the functionality will be very similar, and the concepts still hold.
The web interface is broken up into the following parts:
In addition to the graphical web interface, Roundup has REST and XMLRPC interfaces. These can be used by advanced users and programmers to automate tasks and integrate with other programs.
Lists of Items
The first thing you’ll see when you log into Roundup will be a list of open (ie. not resolved) issues. This list has been generated by a bunch of controls under the covers but for now, you can see something like:
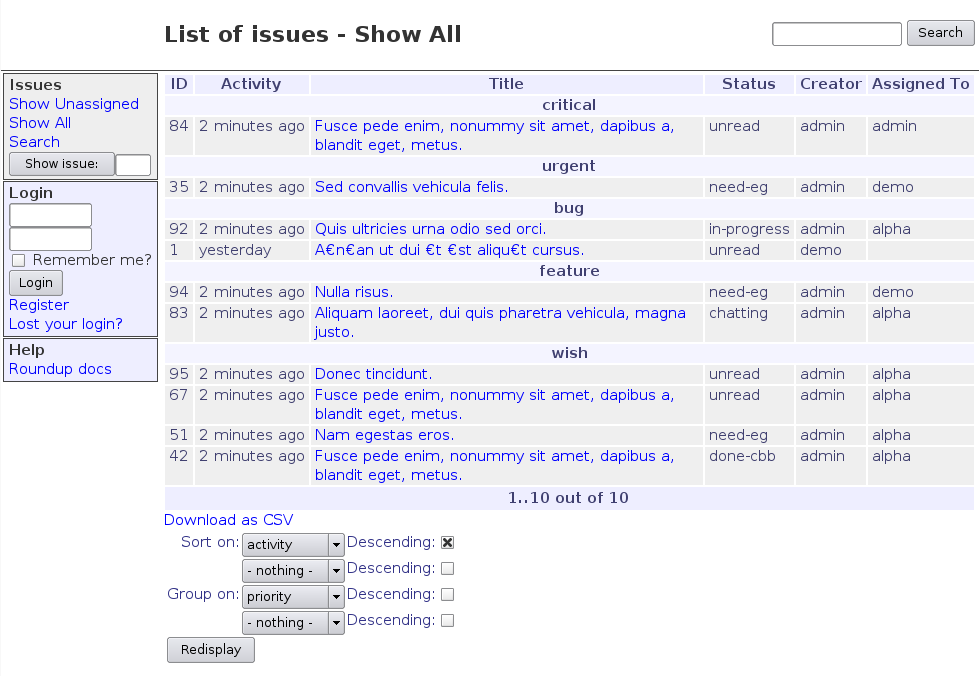
The screen is divided up into three sections. There’s a title which tells you where you are, a sidebar which contains useful navigation tools and a body which usually displays either a list of items or a single item from the tracker.
You may register, reset your password or log in. Registration takes you to:

Clicking on the “Lost your login?” link allows you to reset your password. Resetting your password takes you to:

You can enter your username to get a reset email sent to your primary E-mail address. Otherwise you can enter your primary E-mail address or an Alternate E-mail address to get a reset email sent to that address. The reset email includes a verification link that can be used to complete the password reset. The verification link expires in a week.
Once you’re logged in, the sidebar changes to:
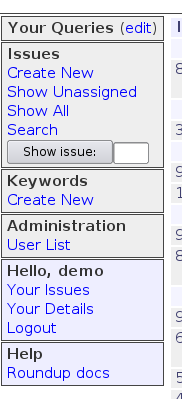
You can now get to your “My Details” page:
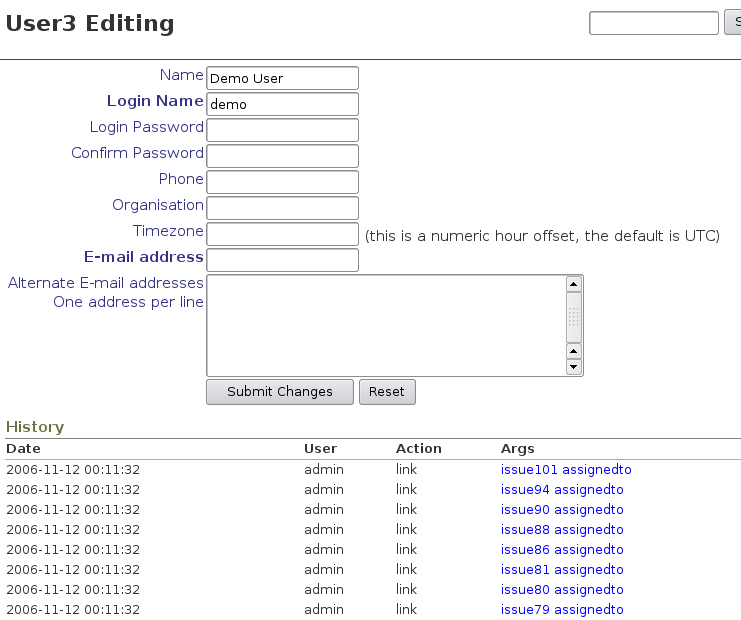
Display, edit or entry of an item
Create a new issue with “create new” under the issue subheading. This will take you to:
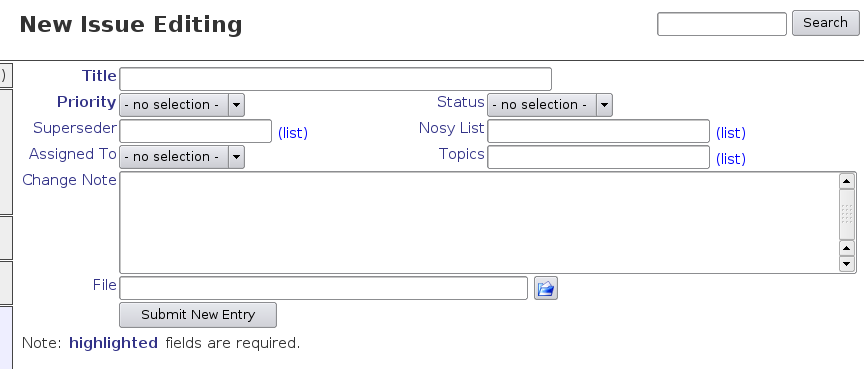
Editing an issue uses the same form, though now you’ll see attached files and messages, and the issue history at the bottom of the page:
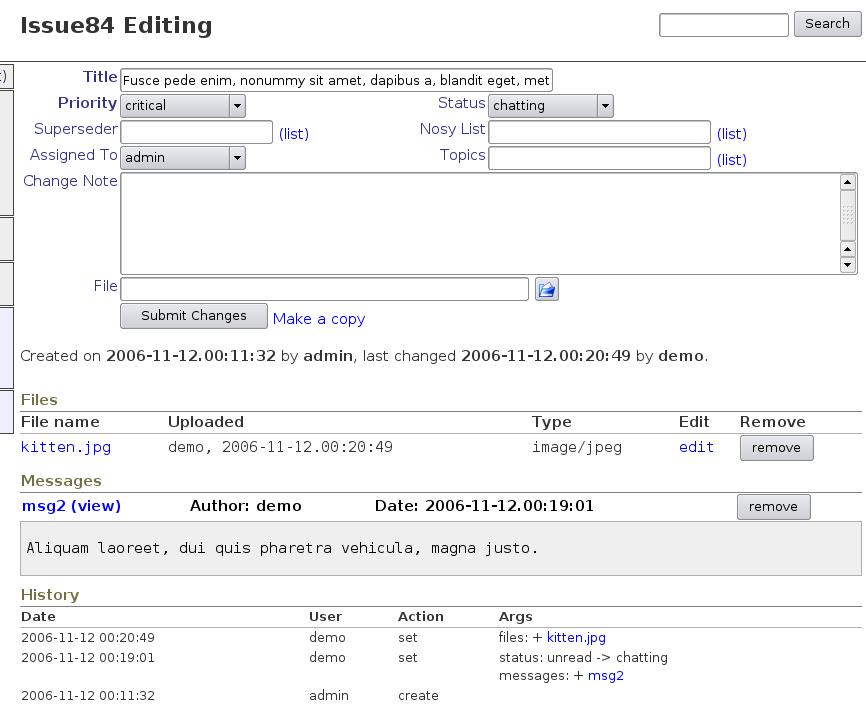
The “Make a copy” link duplicate the current issue copying most of the properties to a new issue. This is useful for splitting am issue into sub-issues that can be assigned to different people.
Searching Page
See entering values in your tracker for an explanation of what you may type into the search form.
Saving queries
You may save queries in the tracker by giving the query a name. Each user may only have one query with a given name - if a subsequent search is performed with the same query name supplied, then it will edit the existing query of the same name.
Queries may be marked as “private”. These queries are only visible to the user that created them. If they’re not marked “private” then all other users may include the query in their list of “Your Queries”. Marking it as private at a later date does not affect users already using the query, nor does deleting the query.
If a user subsequently creates or edits a public query, a new personal version of that query is made, with the same editing rules as described above.
Under the covers
The searching page converts your selections into the following arguments:
Argument |
Description |
|---|---|
@sort |
sort by prop name, optionally preceded with ‘-’ to give descending or nothing for ascending sorting. The sort argument can have several props separated with comma. |
@group |
group by prop name, optionally preceded with ‘-’ or to sort in descending or nothing for ascending order. The group argument can have several props separated with comma. |
@columns |
selects the columns that should be displayed. Default is all. |
@filter |
indicates which properties are being used in filtering. Default is none. |
propname |
selects the values the item properties given by propname must have (very basic search/filter). |
@search_text |
performs a full-text search (message bodies, issue titles, etc) |
You may manually write URLs that contain these arguments, like so (whitespace has been added for clarity):
/issue?status=unread,in-progress,resolved&
    keyword=security,ui&
    @group=priority,-status&
    @sort=-activity&
    @filters=status,keyword&
    @columns=title,status,fixer
Full text search using the xapian, whoosh and native indexers treats the search query as a series of space separated words. Any word less than 2 characters or more than 50 characters is discarded. Also a stoplist is used to remove common words like “with”, “and” etc. Additional stoplist words can be added in the tracker’s config.ini file. Once filtering of the word list is done, each indexed item (e.g. title, file or message content …) is searched and if all the terms are found in the item the item is returned. Then the items are mapped to an issue and the list of matching issues is generated.
Other searching backends such as native-fts can be used in which case the filtering above is not used. The search query can support structure such as quoted phrases, matching one term or another rather than both (or search), prefixes etc. In this case you should look at the documentation for configuring the native-fts backend to find the supported format and features.
Advanced Searching with Property Expressions
You can create more advanced searches in your tracker by using Reverse
Polish Notation (RPN) to make property expressions. By default,
when filtering by multiple items, the expression type is ‘or’. For
instance, if you filter the property assignedto by adding the query
string element assignedto=2,3,40, it matches users numbered 2 or
3 or 40. In RPN, this would be written as 2, 3, or, 4,
or. Roundup uses negative numbers to represent operators. For
example, using “-1” for a single value (e.g. the assignedto Link
property, but not the keyword multivalued/MultiLink property) matches
an issue where the property is ‘not set’.
The operators and their corresponding numbers are:
‘not’ is represented by -2
‘and’ is represented by -3
‘or’ is represented by -4
So, assignedto=2,3,40 is the same as
assignedto=2,3,-4,40,-4. While this example is the same as
2,3,40, the expression keyword=1,2,-3,-2 filters issues that
don’t have both keywords 1 and 2.
Another example is: creator=3,-2,1,-2,-3. This is the same as the
expression: (not user3) and (not user1). Using the rules of logic,
this is the same as: not (user3 or user1) which is expressed in
RPN as creator=3,1,-4,-2. Compare this to creator=3,1,-2 which
returns issues created by user3 or any user other than user1.
Another example, useful when filtering issues, is:
keyword=-1,-2,1,8,-3,-2,-3
which returns issues that have one or more keywords set and the issue does not have keyword1 and keyword8 both set. In more standard infix form:
not empty and not (keyword1 and keyword8)
Typing these expressions manually can be tiresome and tricky. On the
search page, there’s an expression editor. You can access it by
clicking on the (expr) link, which makes creating these
expressions a bit easier.
If your expression has an error, you will be returned to the search
page and an error will be reported. For example using the expression
1, -3 to search the nosy property of an issue generates the
following error:
There was an error searching issue by nosy using: [1, -3]. The
operator -3 (and) at position 2 has too few arguments.
The error message gives you the problem element (-3), it’s meaning
(and) and its position: the second element. The problem was caused
because and requires two arguments, but only one argument (1)
was given.
Another error message:
There was an error searching issue by status using: [1, 2, -3,
-3]. The operator -3 (and) at position 4 has too few arguments.
reports that the second -3 in the 4th position is the problem
operator. Note that this search expression will never return any
values. This is because status is a single value (link) type
property. It can’t have the values 1 and 2, so the expression
1,2,-3 will never return an issue.
In the examples above, the error was caused by not having enough arguments. However you can also have too many arguments. An example of this type of message is:
There was an error searching issue by nosy using: [4, 5, 1, 2, -3,
-3]. There are too many arguments for the existing operators. The
values on the stack are: [Value 4, (Value 5 AND (Value 1 AND Value
2))]
This message gives you the expression as far as it was able to compose it, but value 1 is not combined with the rest of the expression. So another binary operator is needed to complete the expression.
If you have multiple incorrect expressions in your search, only one expression will be reported each time you submit the search.
Using the Classhelper
The classhelper makes finding the id number or name for linked items
easier. It is usually invoked from the parent window by clicking on
the (list) link. There are two classhelpers: classic and
component. This documentation discusses the newer component
classhelper available with Roundup 2.4.0 or newer. If there is a
problem with the component classhelper, it reports the problem and
falls back to using the classic classhelper.
The component classhelper is displayed in a popup window. You can interact with the original window by moving the popup out of the way or minimizing it. If you don’t see a popup, check to see if your browser has disabled popup windows.
The classhelper has three parts:
an optional search pane
a selection pane
an accumulator pane
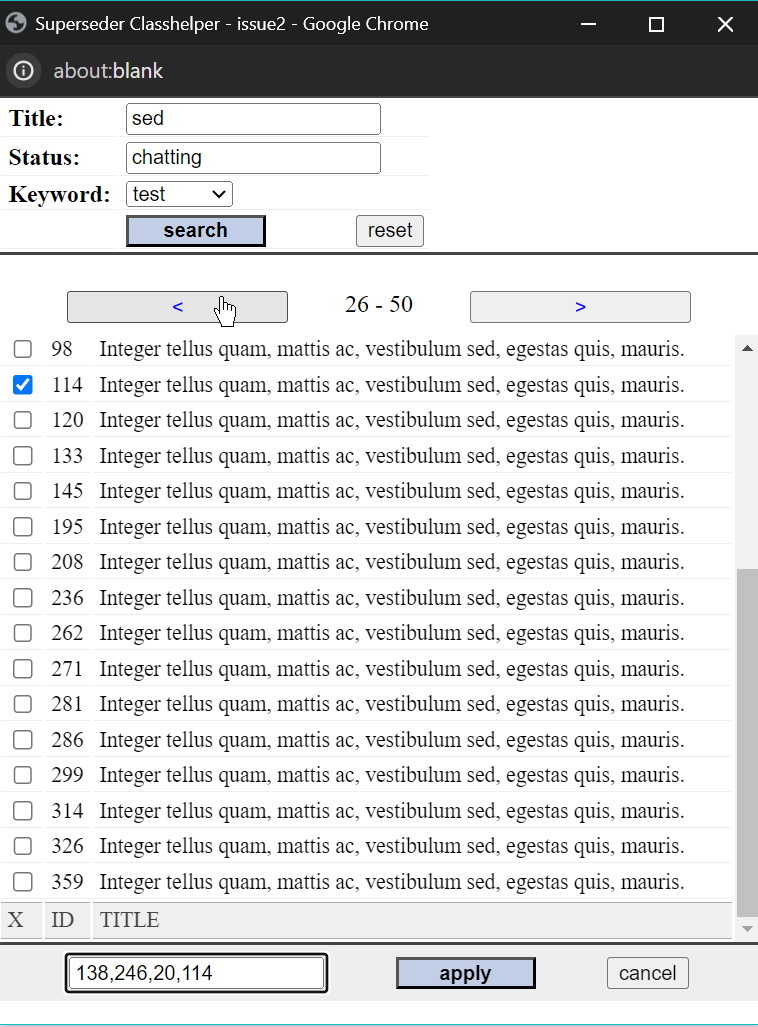
The search pane has text or select/dropdown fields to search for a matching item. The image above shows a search for issues. The Title and Status properties can be matched using a text input while the Keyword property can be selected from a dropdown. Hitting enter while in a text input will trigger a search and the results will be displayed below the search pane in the selection pane. Tabbing to the search button and pressing enter will also trigger a search. The reset button will clear the search form.
Below the search pane is the select pane. It lists the number of items displayed (26-50) and includes two buttons to move to the previous or next page of search results. If there is no search pane, this will display a page of items from all the items in the class. Below the pagination component is the scrollable selection table. Each row in the table has a checkbox and one or more columns of data about the item. Clicking on a row toggles the item’s checkbox and adds or removes the id or name for the item in the accumulator’s display. Arrow keys or tab/shift-tab can be used to scroll through each item in the selection table. The space key or enter will select/deselect the item. You can jump to the page controls using the ‘<’ and ‘>’ keys. Once the page control button is focused, press enter to trigger a page change.
The bottom pane consists of a text input called the accumulator display. It lists all the items that have been selected. The first two items in this example were selected from the previous selection page. Next to the display are the apply and cancel buttons. You can jump to the apply button quickly by pressing Shift-Enter as long as you are not in a search input. Once the apply button is focused, press enter to copy the items in the display to the associated field on the parent window. If you activate the cancel button or close the window using the window decoration, the classhelper will close and not change the parent window.
The classhelper can also be used in read-only mode. In this mode, the accumulator is not shown. Also the checkboxes are not displayed. To close the classhelper in read-only mode use the window decoration or a hotkey (e.g. control-w).
You can have multiple classhelpers up at a time. The title on the window identifies the property and item the classhelper will modify. For example the image shows the superseder for issue2.
Do not refresh the classhelper window using the F5 key. This will
erase the contents of the window and you will have to close it and
invoke the link from the parent window again.
Access Controls
User access is controlled through Permissions. These are are grouped into Roles, and users have a comma-separated list of Roles assigned to them. Roles can allow you to access:
an entire class of items (e.g. issues)
only certain fields of a class (e.g. you can see the username but not the phone number of other users)
fields or classes based on your relationship to an item (e.g. you can see the phone number of your user entry since you are the owner of your user entry)
Other permissions divide access controls up into answering questions like:
may the user edit issues (“Edit”, “issue”)
is the user allowed to use the web interface (“Web Access”)
may the user edit other user’s Roles through the web (“Web Roles”)
Any number of new Permissions and Roles may be created as described in the customisation documentation. Examples of new access controls are:
only managers may sign off issues as complete
don’t give users who register through e-mail web access
let some users edit the details of all users
E-Mail Gateway
Roundup trackers may be used to facilitate e-mail conversations around issues. The “nosy” list attached to each issue indicates the users who should receive e-mail when messages are added to the issue.
When e-mail comes into a tracker that identifies an issue in the subject line, the content of the e-mail is attached to the issue.
You may even create new issues from e-mail messages.
E-mail sent to a tracker is examined for several pieces of information:
subject-line information identifying the purpose of the e-mail
sender identification using the sender of the message
e-mail message content which is to be extracted
e-mail attachments which should be associated with the message
Subject-line information
The subject line of the incoming message is examined to find one of:
a case insensitive
help,a match for
-- key <OneTimeKey>,the item that the message is responding to,
the type of item the message should create, or
we default the item class and try some trickiness.
If the subject is help (case insensitive), the gateway responds
with an explanation of the interface.
If a one-time key is found, we’re processing an in-progress registration confirmation.
If the subject line contains a prefix in [square brackets] then
we’re looking at case 3 or 4 above. Spaces are allowed inside the
brackets and after the class item name. So [issue2] and
[ issue 2 ] are treated the same where any white space is optional.
Any “re:” or “fwd:” prefixes are stripped off the subject line before
we start looking for real information.
If an item designator (class name and id number, for example
issue123) is found there, a new “msg” item is added to the
“messages” property for that item, and any new “file” items are added to
the “files” property for the item.
If just an item class name is found there, we attempt to create a new item of that class with its “messages” property initialized to contain the new “msg” item and its “files” property initialized to contain any new “file” items.
The fifth case above - where no [information] is provided, the
tracker’s MAIL_DEFAULT_CLASS configuration variable defines what
class of item the message relates to. We try to match the subject line
to an existing item of the default class, and if there’s a match, the
message is related to that matched item. If not, then a new item of the
default class is created.
Setting Properties
The e-mail interface also provides a simple way to set properties on items. At the end of the subject line, propname=value pairs can be specified in square brackets, using the same conventions as for the roundup set shell command.
For example,
setting the priority of an issue:
Subject: Re: [issue2] the coffee machine is broken! [priority=urgent]
adding yourself to a nosy list:
Subject: Re: [ issue2 ] we're out of widgets [nosy=+richard]
setting the nosy list to just you and cliff:
Subject: Re: [issue 2] we're out of widgets [nosy=richard,cliff]
removing yourself from a nosy list and setting the priority:
Subject: Re: [ issue 2 ] we're out of widgets [nosy=-richard;priority=bug]
In all cases, the message relates to issue 2. The Re: prefix is
stripped off.
Automatic Properties
- status of new issues
When a new message is received that is not identified as being related to an existing issue, it creates a new issue. The status of the new issue is defaulted to “unread”.
- reopening of resolved issues
When a message is is received for a resolved issue, the issue status is automatically reset to “chatting” to indicate new information has been received.
Sender identification
If the sender of an e-mail is unknown to Roundup (looking up both user primary e-mail addresses and their alternate addresses) then a new user may be created, depending on tracker configuration (see the Admin Guide section “Users and Security” for configuration details.)
The new user will have their username set to the “user” part of “user@domain” in their e-mail address. Their password will be completely randomised, and they’ll have to visit the web interface to have it changed. Some sites don’t allow web access by users who register via e-mail like this.
E-Mail Message Content
By default Roundup only associates plain text (MIME type
text/plain) as messages for items. Any other parts of a message
are associated as downloadable files. If no plain text part is found,
the message is rejected. The tracker can be configured to enable
convert_htmltotext. If this is enabled, an email with an HTML
message (MIME type text/html) and no text/plain part will be
accepted. The first HTML part will be converted to text and used as
the message for the item. Subsequent parts will be treated as
attachments.
To do this, incoming messages are examined for multiple parts:
In a multipart/mixed message or part, each subpart is extracted and examined. The text/plain subparts are assembled to form the textual body of the message, to be stored in the file associated with a “msg” class item. Any parts of other types are each stored in separate files and given “file” class items that are linked to the “msg” item.
In a multipart/alternative message or part, we look for a text/plain subpart and ignore the other parts.
If the message is a response to a previous message, and contains quoted
sections, then these will be stripped out of the message if the
EMAIL_KEEP_QUOTED_TEXT configuration variable is set to 'no'.
Message summary
The “summary” property on message items is taken from the first non-quoting section in the message body. The message body is divided into sections by blank lines. Sections where the second and all subsequent lines begin with a “>” or “|” character are considered “quoting sections”. The first line of the first non-quoting section becomes the summary of the message.
Address handling
All of the addresses in the To: and Cc: headers of the incoming
message are looked up among the tracker users, and the corresponding
users are placed in the “recipients” property on the new “msg” item. The
address in the From: header similarly determines the “author”
property of the new “msg” item. The default handling for addresses that
don’t have corresponding users is to create new users with no passwords
and a username equal to the address.
The addresses mentioned in the To:, From: and Cc: headers of
the message may be added to the nosy list depending on:
ADD_AUTHOR_TO_NOSYDoes the author of a message get placed on the nosy list automatically? If ‘new’ is used, then the author will only be added when a message creates a new issue. If ‘yes’, then the author will be added on followups too. If ‘no’, they’re never added to the nosy.
ADD_RECIPIENTS_TO_NOSYDo the recipients (To:, Cc:) of a message get placed on the nosy list? If ‘new’ is used, then the recipients will only be added when a message creates a new issue. If ‘yes’, then the recipients will be added on followups too. If ‘no’, they’re never added to the nosy.
Some organisations might prefer to have someone moderate emails before
they are delivered into Roundup. Those might want to set the
configuration option EMAIL_KEEP_REAL_FROM to 'yes' to avoid
having the moderators address appearing as the creator of issues.
Nosy List
Roundup watches for additions to the “messages” property of items.
When a new message is added, it is sent to all the users on the “nosy” list for the item that are not already on the “recipients” list of the message. Those users are then appended to the “recipients” property on the message, so multiple copies of a message are never sent to the same user. The journal recorded by the hyperdatabase on the “recipients” property then provides a log of when the message was sent to whom.
If the author of the message is also in the nosy list for the item that
the message is attached to, then the config var MESSAGES_TO_AUTHOR
is queried to determine if they get a nosy list copy of the message too.